
I Curated My Own Peloton Setup - For Less Than Half the Cost of the Real Thing
Right before quarantine, I started taking spin classes, and I loved it. Then the studio closed, I don’t know when I’ll ever get back, and the loss of twice weekly spin classes left a Grand Canyon-sized hole in my life. So I started looking into getting a bike at home. Peloton is only getting more popular, and I thought, “I’ll just get one of those!” HA HA HA. A Peloton bike costs $2,245, plus $40 a month to gain access to classes on the built in screen. There’s a payment plan, sure, but if you run those numbers it ends up costing even MORE. There are knockoffs, like the NordicTrack one I’ve been seeing a TON of ads for. It’s cheaper… but still $1,600.
If you can afford to buy a pricy bike, mazel tov to you, but I just couldn’t justify (or afford!) a purchase like that, especially because once quarantine is up, I might want to return to spinning only at the studio, where they maintain the bikes for me and give me a cold lavender towel after class. Luckily for me, there’s a whole gang of folks who are creating DIY Peloton setups at home, and through their guidance and tons of research, I managed to curate an at-home spin studio that’s quite frankly? Fantastic. And here’s the real amazing part: I bought a more expensive bike than I planned. I bought extra stuff to more accurately re-create the studio experience. And I haven’t spent HALF as much as a Peloton bike would have cost me. Here’s how I did it.

The Bike
There’s one bike that almost every DIY Peloton setup uses, and like most fitness equipment these days, it’s sold out. Or it was when I was bike shopping. As of my writing this the Sunny bike is back in stock, and the Pyhigh one I got is not available. My advice is to keep checking on a VERY regular basis and once you see something you want, get it immediately. The bike I ended up getting is the Pyhigh S7, which at $500 was more than I initially wanted to spend, but options were limited and through all my researching this seemed like a good choice. You have to assemble it, and I was worried I wouldn’t be able to do it on my own, but I got it put together in less than an hour. The hardest part of the whole thing was getting the heavy box over the threshold of my front door, and breaking down all the packaging so it would fit in my trash/recycling bins.
One thing I noticed in my bike research is that if you’re trying to keep the cost of your bike down, you need to decide what features you want to come with the bike, and what you can live without. If you want a place to hold hand weights and a tablet holder and clipless pedals you’re going to be spending way more than if you get a bike with just a tablet holder and DIY the rest. Which brings me to…
The Pedals
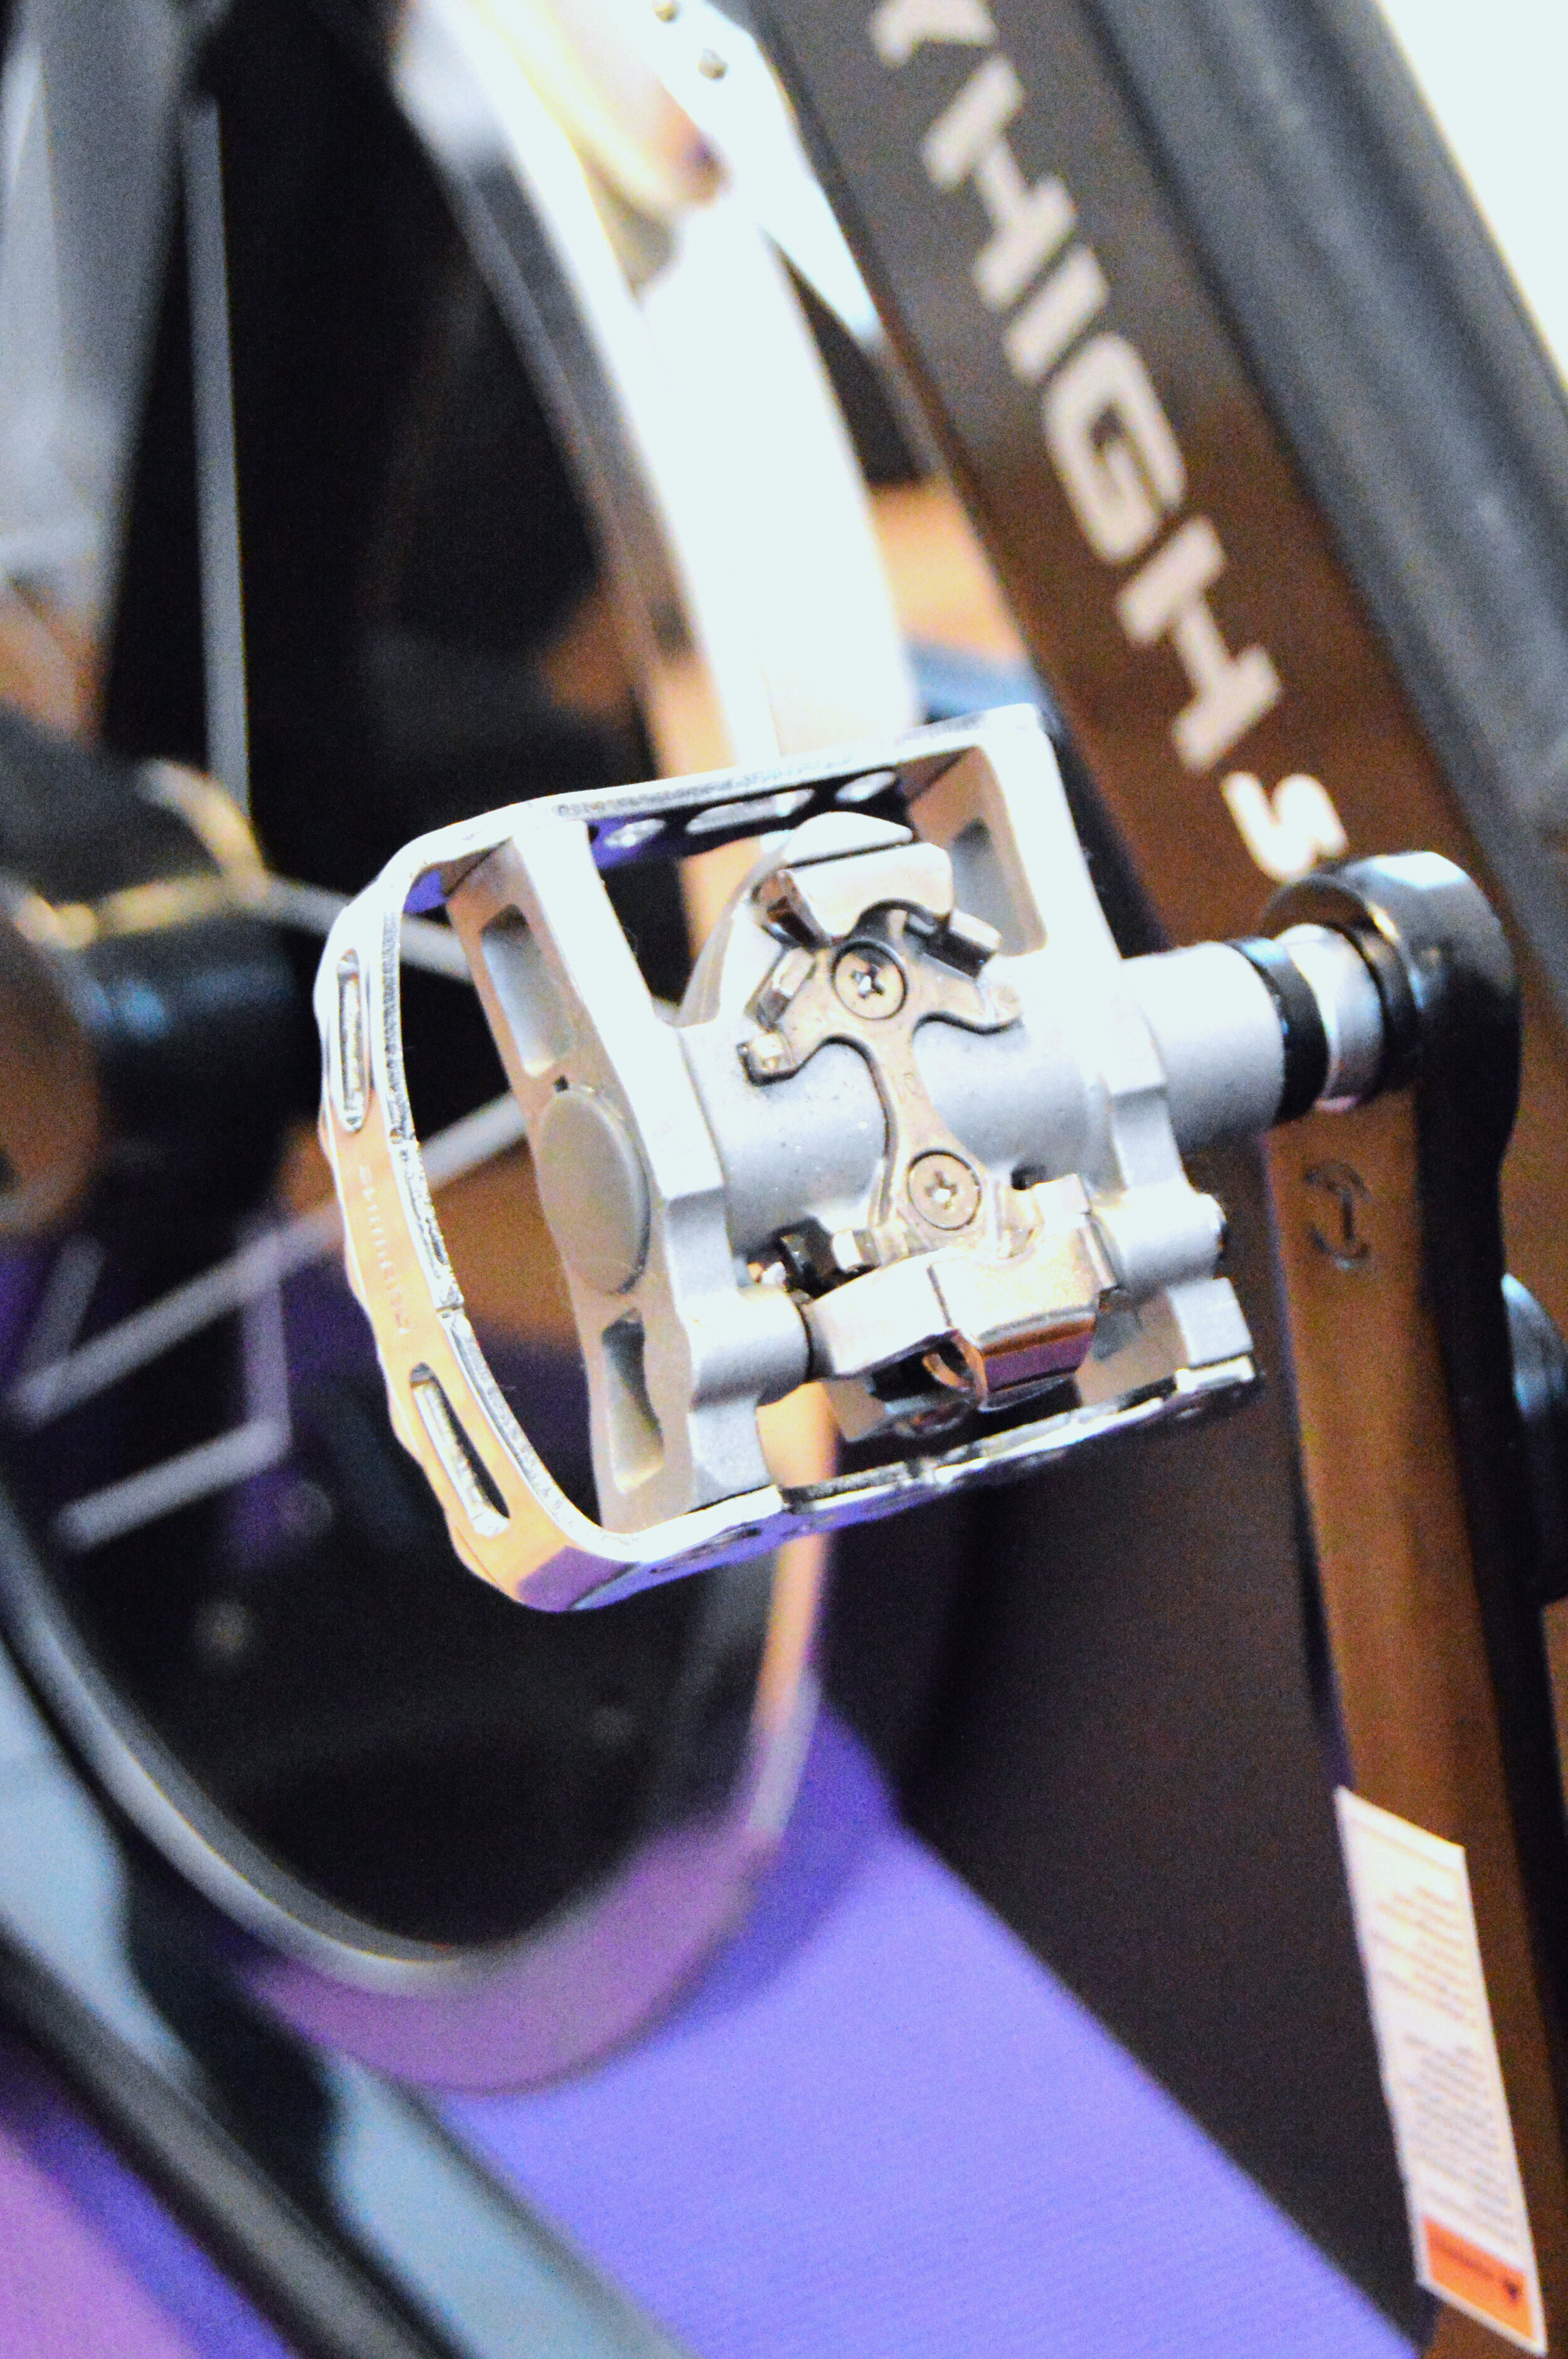
Since my only experience with indoor cycling is at a spin studio where the bikes have clipless pedals and you use special shoes with cleats, I wasn’t super hyped about the pedals that came with the P7. My initial plan was to use them for awhile and see if I really wanted to swap them out for clipless pedals, but after watching a bunch of cyclist YouTube videos and hearing cyclist after cyclist say, “Once you use clipless pedals you can’t go back” I decided to buy some new pedals for my bike. I went with this pack of Shimano SPD pedals because they’re what Michelle at My Purse Strings got for her bike (her post and YouTube video were invaluable resource in the DIY Peloton process) and because they came with SPD clips, so I didn’t have to make yet another purchase (keeping all my various orders straight was a project in itself). The other nice thing about these pedals is that one side is for clipping into, and the other side is just a regular flat bike pedal. I thought this could be convenient in the off chance that I or someone else wants to use the bike without clipping in. (Fun terminology sidenote: The pedals are called clipless pedals but you use them with CLIPS and you call the process of using them CLIPPING IN and everyone just goes with it. Yes, I know it’s because the old style of pedals had elaborate clips and now it’s easy, therefore “clipless,” but it’s still a bit nonsensical)

The Cadence Sensor
I was building this bike without ever having looked at the Peloton app, so I really hand no idea what a class was like. My spin studio doesn’t use stats of any kind, and the bikes don’t even have display screens. When I kept reading that I’d need a cadence sensor for my bike, I really thought it was optional. I figured (like with the pedals!) that I’d get the bike as-is, take some classes, and see if I wanted to add whatever a cadence sensor was. Then I watched some YouTube videos about both Peloton and setting up a faux Peloton, and yeah, you need a cadence sensor. All Peloton classes are taught as if you are on a Peloton bike (makes sense!) and the Peloton bike uses two measurements: Resistance and cadence (the two together give you your output, which is used to rank the leaderboard - irrelevant for non-Peloton-bike users). Instructors will regularly tell you your resistance should be between 40 and 50 (or any other range, it varies!). Without the specific Peloton bike, these numbers are just vague guidelines, and you just… guess. In spin class when the instructor yells out “Two turns to the right!” I will often do one turn, or no turns, or turn to the left because I’m TIRED. So not following Peloton’s resistance guidelines is no big deal for me. Cadence is how fast you’re pedaling, and it is a big part of Peloton classes and something that I pay close attention to. This also helps you know where your resistance should be, since it’s kind of up to you to figure that bit out. For example: Say the instructor is telling us that our resistance should be between 60 and 70, and our cadence should be between 50 and 60. I have no idea what that resistance is on my bike, but to have such a slow cadence (ie, doing a climb) I know that I need to up that resistance (for reference, your warm up and cool down is usually an 80 to 90 cadence, so 50 is S L O W). This all makes SO MUCH MORE SENSE if you’re seeing it in person, or even on a video. Suffice it to say, you need a cadence tracker.
Everyone (truly, everyone) who DIYs a Peloton experience uses the Wahoo Cadence Sensor. You attach it to a pedal of your bike and download the Wahoo app on your phone and the little sensor uses bluetooth to show your cadence on your phone. I’ve recently ordered a holder for my phone so I can attach it to my bike handlebar and won’t have to keep turning my head to see my cadence (I set the phone on the rack I keep all my accessories on). My only tip with the cadence sensor is to attach it to the inside of your pedal arm. I put it on the outside, which was next to my foot/leg, and I knocked it right off during a spin.

The Shoes and Cleats
First of all, a confession: I made a mistake with my first pair of shoes, and I’m in the process of getting different shoes and returning these pain-causing boogers. I bought Tiem Slipstreams because they are cool looking. Literally that was my only criteria, apart from them being SPD compatible. I chose the prettiest shoes and it turns out they’re not working for me, so I’m going to return them once I get my new shoes, the Shimano RP1s. These are the shoes that my spin studio uses, so I know what size I wear and that they work for me. There’s enough room too for all the weird cycling foot accessories I got. I think I’ll do a whole separate post on shoes and feet, because I messed mine UP at first and now I’m leaning from my mistakes and correcting the damage I have wrought on my poor feet.

I got the cleats with my pedals, and they’re very easy to put on the shoes. BUT, it takes some adjusting to find out what works for you. I moved my cleats around a few times, and finally (after causing myself some serious foot pain) I did a ride where I just kept pausing and getting off the bike and adjusting my cleat position. I did that about three or four times and finally got to a good place. But then decided to exchange my shoes, so it was kinda sorta for naught. I did learn something, ugh, whatever. Anyway, I’m still in the process of working out my shoes, but the most important thing is to make sure that your pedals, shoes, and cleats are all compatible. When I switched shoes, I had to buy some cleat adapters to make my Shimano shoes work with my Shimano SPD cleats. Even just getting the same brand won’t solve your problem! Also, while I was first putting my cleats on my shoes, I did it while watching this video, which I found both soothing and helpful.
Some Extra Extras
I already bought more for my bike than was strictly necessary, but there are a few other things I found helpful on top of that. The bike and the pedals come with everything you need to assemble them, but I found it handy to have a bike multi-tool. I got this one, which has like a hundred little boobly-bobs on it (pro bike term) and I’ve only used two Allen keys. But it’s good to know I have whatever potential tool I could need, and when I bought all this stuff I didn’t know I wouldn’t need more tools, so I wanted to be prepared.
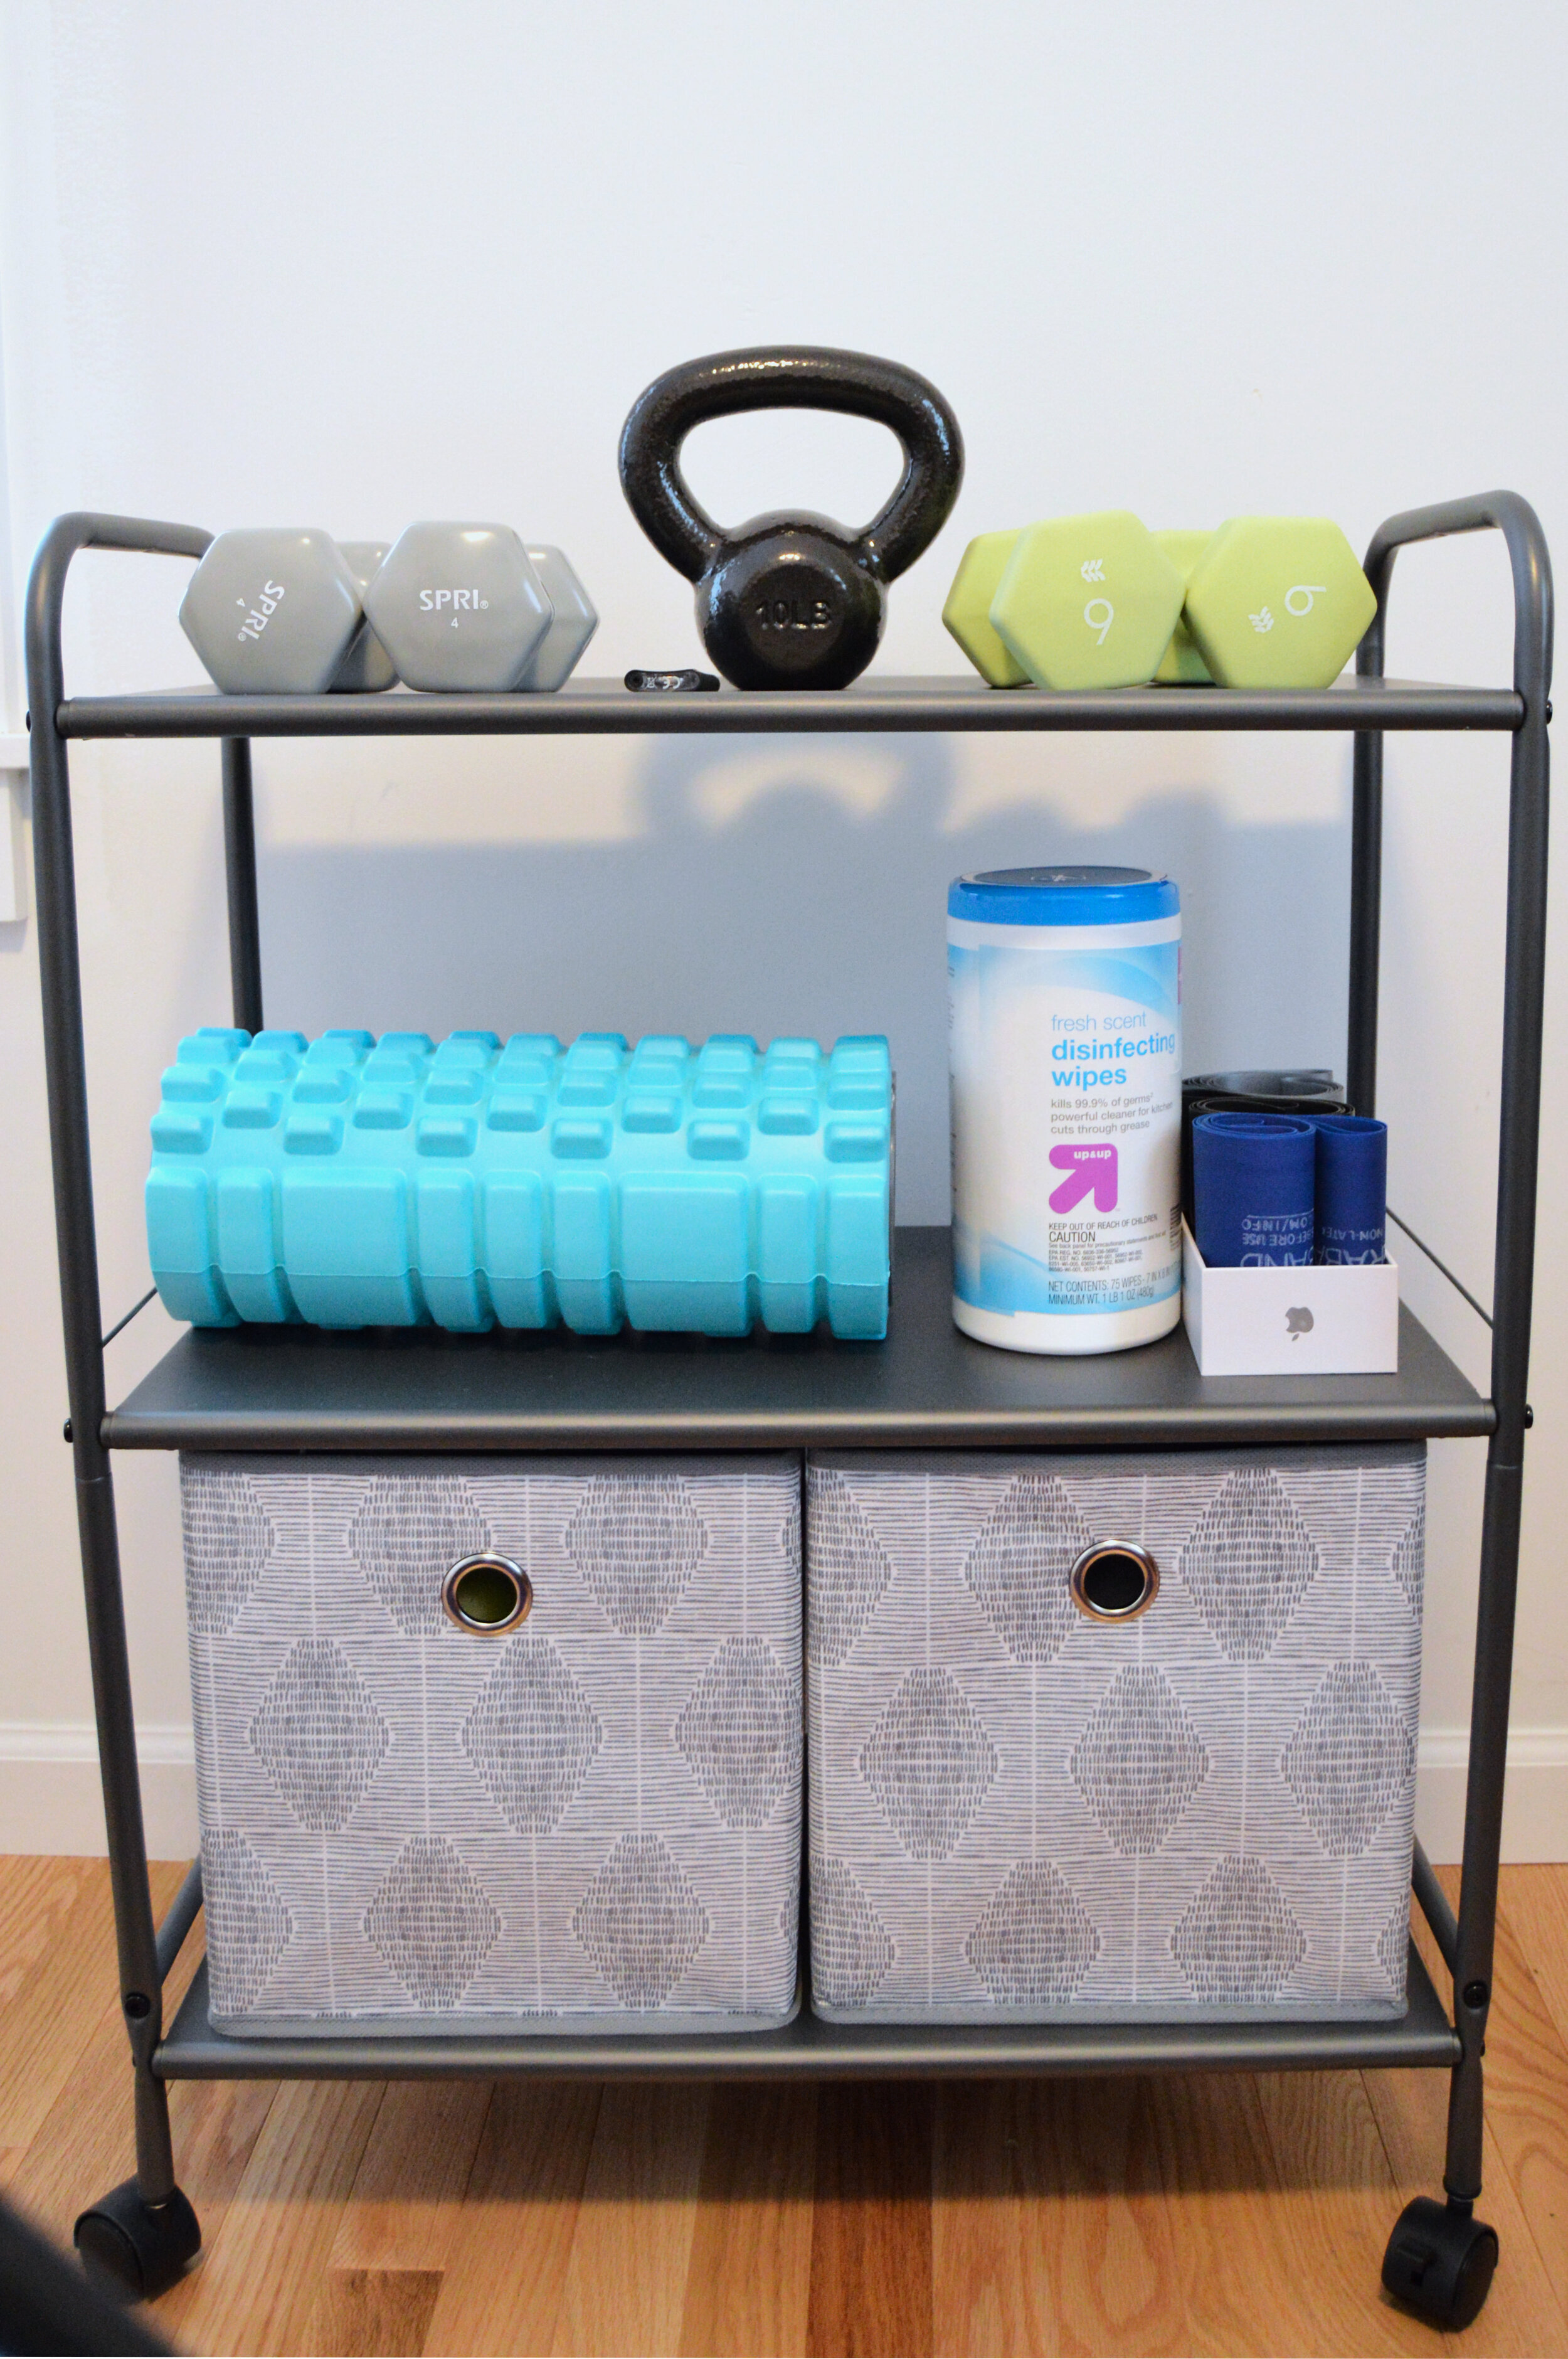
I also upgraded from using a sheet pan on top of a luggage rack and bought a little wheely cart to keep all my exercise stuff on. I have my weights on the top (they use like, 2lb weights during spin classes and the lightest I have is 4lbs so I’m about to come out of this quarantine JACKED), the second shelf has a foam roller and some bands and wipes (I wipe down the handlebars and seat after each workout), and the bottom has two little bins, one filled with towels and the other holds my little core ball, some extra roller things, and my bike toolkit.
I am currently using a yoga mat under my bike. I have a thicker mat, specifically for indoor bikes and treadmills, coming in a week or so. I also ordered a new yoga mat today because I have the feeling once I take this bike off my old mat, she’s going to be a bit worse for wear. My point is, if you have multiple yoga mats, or you’re reading this during a time of non-quarantine and can just got get a mat at Target like it’s nothing, you may not need to jump through this many hoops just to protect your floors.


Oh! And the App!
The Peloton App is currently free for NINETY DAYS. I mentioned this already, but it’s a great app and 90 days is a LONG time. I won’t have to pay for the app until JULY. And even then, it’s only $13 per month. If you have the actual Peloton bike, it’s $40 per month and it’s mandatory that you buy it for a year. I mean, this DIY setup just gets better and better. Granted, I don’t think app users can be on the leaderboard, but you CAN get a free tee shirt after 100 rides. I’m clearly obsessed because once I found out I could get a crappy tee shirt for doing 100 spin classed I was like, “Ooooh! A tee shirt! I have to get it!” I’m very reward motivated.
The app is very easy to use and their cataloging system is almost perfect. The only thing I wish I could do was filter by workouts that use weights. There are workouts called “Intervals and Arms” which tend to be my favorite, and obviously have an arm component, but then something called “90s Pop Ride” will have arms, and I can only find out by clicking through to the class page. It’s a small complaint, and really all I can come up with to gripe about. Like I mentioned in my other at-home workout post, I like to pick out rides while I’m just chilling on the couch, and bookmark them for later. Then I don’t waste time when I’m actually interested in a workout scrolling through to find what I want.
I stream my Peloton workouts on my iPad mini, which fits perfectly into the tablet holder built into my bike. I was worried I’d need to secure it somehow, but either because the handles are a bit grippy or because it’s a small iPad, it fits snugly and doesn’t move at all. I also worried the sound wouldn’t be loud enough, and I considered using my bluetooth speaker in tandem with the iPad, but the volume from the iPad itself works great.
I also use my Apple Watch to track my workouts, because it gives me more and better data than Peloton. You can sync the Peloton App to the Apple Watch, but I found it just logged two workouts when I tracked on my watch as well, and I liked the Apple data better, so I disconnected Peloton. The iPad and Apple Watch I owned before any of this other stuff, but here’s a breakdown of what I spent on my DIY Peloton setup:
Bike: $500
Protection Plan: $43 (I bought a bike sight unseen and wanted some added security!)
Mat: $20
Pedals and cleats: $40
Wahoo Cadence Sensor: $40
Bike Multitool: $10
Shoes: $97 (Normally $130. They were on sale and I used part of my REI member dividend) (Also these are the shoes I’m returning, WHOOPSIE)
Total: $768
Remember a Peloton is $2,245 at the cheapest, and that’s not including the $40 PER MONTH membership fee, which is mandatory for the first year. So, being very generous, my setup is almost ONE THIRD of the cost of a Peloton. And when I need to start paying for the app, $13 per month is less than a dollar a class (at the rate I’ve been taking classes). I hope this was helpful, and I hope if you’re looking to do some biking to nowhere, you can start your journey soon!